This post will review the process for a headless install of the Raspbian Stretch OS with SSH enabled and the Wifi connection information pre-configured. This is extremely useful when a Raspberry Pi (models: 3 B+, 3 B, 2 B, 1 B+, 1 A+, & Zero W) will not be connected to a monitor.
Downloading and Extracting Raspbian Stretch OS
Download Raspbian Stretch OS (URL https://www.raspberrypi.org/downloads/)

Navigate to the dowloaded file and extract


Flashing the Raspbian Stretch OS
To flash the extracted Raspbian Stretch OS to a micro SD card (8 GB or larger size suggested):
- Download & Install Etcher (https://etcher.io/)
- Plug the micro SD card into the computer
- Launch Etcher and select the Raspbian Stretch img file extracted in the previous step
- If needed, change the device to the micro SD card
- Flash the img file to the SD card

Enabling SSH
Open a text editor (Notepad)

Save the untitled notepad document to the micro SD card
- With the untitled notepad document open, select File>Save As...
- Navigate to the recently flashed SD card
- Set the Save as type to All Files (*.*)
- Set the File name to ssh
- Save
*Note* the notepad document should not contain any text. Saving the file to the SD card is letting the operating system know to enable SSH connections.

Configuring the WiFi Connection
Configure the WiFi connection by:
- Opening another notepad document
- Copying and pasting the text identified below into the notepad document
- Update the ssid value to your WiFi network name
- Update the psk value to your WiFi password
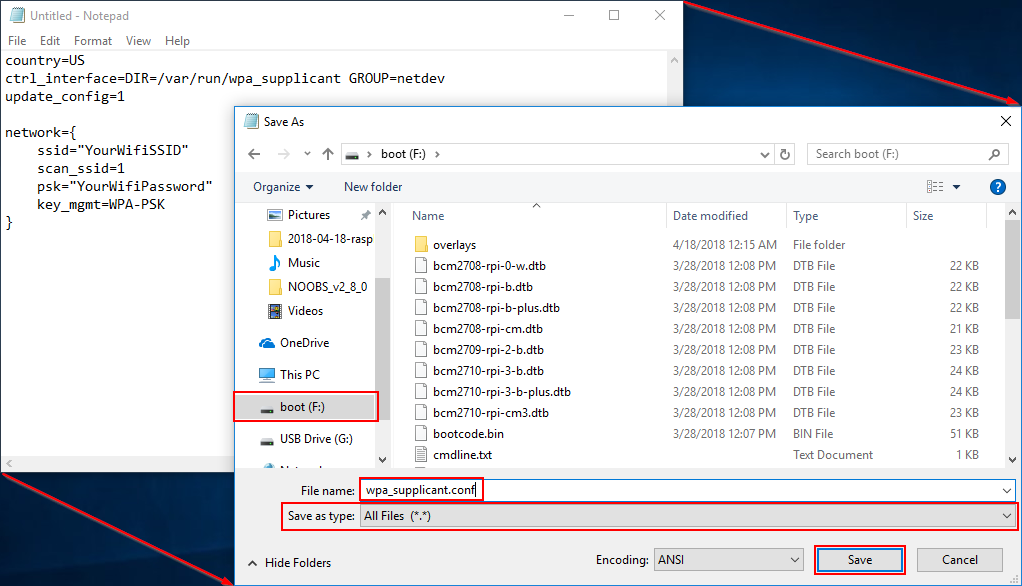
- Select Save As... in the notepad document
- Navigate to the recently flashed SD card
- Set the Save as type to All Files (*.*)
- Set the File name to wpa_supplicant.conf
- Save
The wpa_supplicant document will need to contian the below infomation. (Update ssid and psk values appropriately)
country=US
ctrl_interface=DIR=/var/run/wpa_supplicant GROUP=netdev
update_config=1
network={
ssid="YourWifiSSID"
scan_ssid=1
psk="YourWifiPassword"
key_mgmt=WPA-PSK
}
Remove the SD card from the computer, insert the SD card into the Raspberry Pi, and power on the Raspberry Pi.
Identifying the IP Address for an SSH Connection
To identify the IP address assigned to the Raspberry Pi
- Prior to turning on the Raspberry Pi, on a computer that is connected to the same WiFi network
- Launch a command prompt and type "arp -a"
- Note the IP addresses that are listed

3. Power on the Raspberry Pi
4. In the command prompt, reenter "arp -a" again and note the new IP address

Use the new IP address for an SSH connection into the Raspberry Pi.
Establishing an SSH Connection
Launch an SSH client. (A popular and free SSH client is Putty and can be downloaded here: https://www.chiark.greenend.org.uk/~sgtatham/putty/latest.html)
Enter the Raspberry Pi IP address into the Host Name field and click Open. (The Port value should be 22 for SSH connections)

When prompted click "Yes" on the security alert. This prompt will only be displayed on first SSH connection to the Raspberry Pi established on the computer.

Enter the login credentials for the Raspberry Pi. The default login credentials for a newly installed Raspbian Stretch OS are:
- Username: pi
- Password: raspberry

An SSH connection into the Raspberry Pi has now been established.
